So here's a mini tutorial on how to do it.. assuming I understand your question correctly.
Have the picture ready, flatten the image (right click on any layer, then "Flatten Image"), then "Create Layer from Background". Name it Layer 0 or whatever you want.
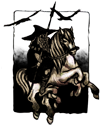
Next, use the magic wand (oranged-out tool) and select and and delete everything you want to be transparent.
It should look like this:
Then go to Layer -> Layer Mask -> Reveal all, then click on the white box to the right (Under "Layers")
Now go over to Channels, and click on the one at the end "<layer name> Mask"
Use the paintbucket to color in the places you previously deleted (it won't show, but look at the box next to "Layer 0 Mask")
Save as -> .PNG
And viola! You have yourself a "lolwut" with a transparent background!
I really am too tired and... err... *points at bottle of beer*... to understand the point of masking. I just select the texit for example with the Magic Wand Tool, copy-paste it and I already have the layer with text and transparent background. Looks like a way to complicate stuff to me. :mellow:
Actually, what Captainpoo explained is quite intricate. You can 'paint' inside a layer mask, allowing you to get a better result than the cut-out via magic wand.
Another huge upside of masks is that you can revert anything you've done without relying on the photoshop history. This, and a mask gives you some other few possibilities for special effects.


![[Image: 1.jpg]](http://infiniwhee.com/flarea/fl_poo/transtut/1.jpg)
![[Image: 2.jpg]](http://infiniwhee.com/flarea/fl_poo/transtut/2.jpg)
![[Image: 3.jpg]](http://infiniwhee.com/flarea/fl_poo/transtut/3.jpg)
![[Image: 4.jpg]](http://infiniwhee.com/flarea/fl_poo/transtut/4.jpg)
![[Image: 5.jpg]](http://infiniwhee.com/flarea/fl_poo/transtut/5.jpg)
![[Image: 6.jpg]](http://infiniwhee.com/flarea/fl_poo/transtut/6.jpg)
![[Image: 7.jpg]](http://infiniwhee.com/flarea/fl_poo/transtut/7.jpg)
![[Image: lolwut.png]](http://infiniwhee.com/flarea/fl_poo/transtut/lolwut.png)
![[Image: GhostSleip.png]](http://i281.photobucket.com/albums/kk206/gabelzahnmoos/My%20Signatures/GhostSleip.png)